-Sequence and Organization of the Unit:
Topic Taught:
Building a humane zoo! Historically, zoos are places where collections of exotic animals from all over the world are held and displayed as entertainment for zoo visitors. In more recent years, the issue of weather or not it is humane to keep wild animals in captivity has become a controversial topic. Some argue that captivity is wrong while others argue it is necessary to avoid extinction. In this unit, students explored how they could create the best possible habitat for animals so exotic they are out of this world! The main focus of the unit is relationships, more specifically the relationship between form and function. Given what you know about your six-headed dragon or unicorn, how can you create an environment that best meets all of the creatures needs?
Lesson 1: Breaking Ground
To begin, students get their unique imaginations rolling by sketching ideas for their creature/ mystical animal in their sketchbook. After a bit of brainstorming, Students will look through books that focus on natural biology while sketching down their ideas and building upon previous knowledge. Research done by each student will depend on the creature they choose. The students will be able to use traditional resources for ideation of new art. One visual element we will ask students to focus on is how the texture of their creature is influenced by the environment it lives. We want students to understand how physical features of their creature are related to the environment they live in. This art lesson is focused on developing ideas and showing students the importance of understanding your subject matter when creating a work of art. To assess what the students have learned, the teachers will collect a ticket out the door consisting of a quick write that explains what the creature eats, where it lives, and how big it is.
Lesson 2: Feeling it out
This lesson focused on visual elements of 2-D texture and how they relate to creating texture in a 3-D form. This lesson is also geared towards getting the students to experiment with and explore the new material of clay. Whether they are building it up, scratching away at it, or imprinting things into it, students will work towards replicating textures they recognize from the world around them with. Also students will be introduced to traditional clay building techniques such as slip and score, coil building, use of armature, and pinch pots. Through this process, students will explore a variety of tools that can be used with clay to actually begin building their creature . This will be one of the guiding steps towards figuring out which direction they want to take their zoo enclosure. In this lesson we will also emphasize how to transfer drawn 2-D plans for the animals into 3-D clay creations. Once students have become more comfortable with the material of clay we will focus on deepening the relationship between the creature and its environment by reiterating the importance of physical features such as texture and animal anatomy.
Lesson 3: Art of planning
The overarching theme of this lesson is how to take an idea in your head and bring it to life by creating an art object. In this lesson we will look deeper into the planning process by focusing on how artists use 2-D mediums to create 3-D works of art. Students will look at how several artists plan for 3-D production by drawing from several perspectives. Students will then plan for their own 3-D production by drawing their enclosure from 3 different perspectives: that of a zoo visitor, of the creature they created, and of a bird flying overhead. After creating 2-D plans for their creatures environment students will bring their ideas to life using a wide variety of mixed media materials. Once they have finished their individual enclosures we will talk about the importance of presentation by putting the enclosures together to prepare for the “big opening” of their zoo. Students will reflect on their design decisions by putting together informational brochures that are intended to let visitors know more about their animal.
-Methods for Integrating Literacy, Numeracy, Technology and Other Relevant Subjects:
Lesson 1: Breaking Ground
This lesson had a heavy emphasis on literacy. Students spent time in the library gathering information about their creature and its environment. Students practiced literacy skills when they read through books about natural biology, and recorded information they found important using words and pictures. Also, each student practiced literacy when they articulated their research findings to their peers upon returning to the classroom. One thing we focused on with this lesson was how students could portray the size of their animal in their drawings. With this, students successfully practiced the numerical skill of proportion by using relative size to display the relationship between 2 objects. Through this lesson students practiced the 21st century skill of identifying relevant information. Students had all the books in the library at their disposal. It was their responsibility to pick ones that would provide them with the information they needed. From there, students needed to go even further and sift through all the information the books provided them with and isolate the facts that were relevant to their specific project idea.
Lesson 2: Feeling it out
This lesson incorporated technology through the presentation of information. This lesson began with a powerpoint presentation that showed images of historically relevant ceramic work regarding texture and clay building techniques. Numeracy skills were practiced when students learned how to use clay building techniques like scratch & slip, and coil building. To successfully use these clay building techniques, students needed to recall and engage in the correct sequence of steps they were taught at the beginning of the activity. Literacy skills were practiced in this lesson when students made discoveries about clay tools and techniques. While students experimented with using clay materials and creating textures with clay they were to record the what they discovered in their sketchbooks. After the discovery table was filled with samples of clay textures, the class gathered and each student articulated the discoveries they made to the rest of the class. Articulating discoveries required recalling the sequence of events that led a student to the discovery they made, causing them to practice numeracy skills as well as literacy skills. Working with clay helped student develop the 21st century skills of independent exploration and creative problem solving. Students explored the material independently to discover what it was capable of. The also experimented with how they could manipulate it to most accurately create the project they had envisioned and planned for . Since clay is new to most of these students, they had to problem solve creatively to solve unexpected structural issues.
Lesson 3: The Art of Planning
Literacy was practiced in many areas of this lesson. Students used their literacy skills when they articulated the creative decisions made while drawing plans for their exhibit from multiple perspectives. Each student spoke about why they drew their exhibit the way they did, as well as what elements they included for their creature. After this lesson transitioned from ideation and planning to physical creation students were asked to share and discuss different elements of their work, as well as discoveries they made about materials. Also, on the final day of class students studied the information included in labels of zoo enclosures and the labels of museum gallery exhibitions. Literacy skills were practiced when they wrote labels for their zoo enclosure and created artist statements in their sketchbooks explaining the creative process they engaged in. With this lesson students practiced the 21-century skill of making connections. Students made the connection between an art museum and a zoo through the way information is displayed in these too seemingly unrelated contexts. The 21-century skill of creative problem solving and independent discovery were also practiced in this lesson while students worked with mixed media to complete their creatures and create their environments. Creative problem solving and independent discovery were practiced while students worked to use materials in ways other than what they were intended for. Also, students had to figure out how to manipulate these materials to make structurally sound projects, causing them to problem solve creatively as unexpected problems arose. Technology was used in the presentation of relevant background information and real life examples for each activity throughout this lesson. Images and task requirements were often presented in the form of a PowerPoint presentation displayed on the smart board. Students practiced numeracy skills as they worked on the creation of elements that fit in a specific space. Each student was provided with the same size box to use as the foundation for their habitat. Students had to manage relative size of environmental elements to make sure that everything proportionally made sense in the space provided.
-Strategies for Classroom Management relevant to Lesson Taught in the Unit:
Lesson 1: Breaking Ground:
Because this lesson took place in the library we needed to get students from the classroom to the library without disturbing other classes that were in session. To do this, we asked everyone to line up and stay quiet until we got to the library. To manage student behavior during this transition we had one teacher in the front to lead the group, one in the middle of the line to keep an eye on students, and one at the very end to make sure no one got left behind or went astray. To get the art materials necessary for this lesson to the library we made each student responsible for their own sketchbooks. Then we had students volunteer to be responsible for carrying the colored pencils, the markers, or the crayons. Each student who volunteered to be responsible for getting a material to the library was also responsible for making sure the materials made it back into their containers and back into their designated location in the classroom. To manage student behavior in the library we told students to first pick a few books they thought would be helpful, then bring them directly back to the tables while they looked for information they wanted to record in their sketchbooks. Because this lesson had such a heavy emphasis on literacy skills, I made sure to clarify that students were able to record information however they felt wold be most helpful for them. This ensured student success by taking the emphasis off of the students level of literacy and placing it on their ability to engage in the activity. Upon returning to the class room we asked all students to gather in the front of the room where they usually do and listen while each of their peers shared what they found in the library. After each student shared they placed their sketchbooks on the table in the front of the classroom and left for recess. This allowed us to be sure that every student returned their sketchbook and that none of them got lost.
Lesson 2: Feeling it Out
This lesson focused on clay, making set-up and clean-up important factors to consider while planning for activities. Because we are in a normal classroom instead of an art room it was important that we took extra precautions to protect classroom. To keep the tables safe we came in before students arrived to stretch black plastic bags over the table tops, keeping them tight and secure by taping them on the underside of the table. Before bringing out the clay we discussed the importance of behaving responsibly while using clay and clay tools. The importance of being careful not to get clay on the carpet and being conscious of getting clay on other things in the classroom was specifically emphasized. We also discussed that the intentional mistreatment of clay, such as throwing it, would absolutely not be tolerated. We placed a box with clay tools at the back of the classroom and asked students to only take a few to their tables at a time. With this we also discussed that the clay tools were to be handled with care because some of them are very sharp and could potentially hurt someone. To clean up after working with clay we had each student place their creature in a box on one of tables, stack their sketch books on the table in the front, and make sure they picked up all the little clay pieces from their work station. Next we divided students into groups and gave each one a cleaning task. Group one was responsible for collecting extra clay from desks and putting it in the designated bag, group two for collecting tools and putting them all back in the tool box, group 3 for taking the plastic off the tables to throw away, group four made sure there was nothing on the floor and that everyones name tags made it back onto their desks. Breaking students into groups for clean up was the best way to make sure all students were actively helping to clean up in a timely manner. We used clay on more than one occasion and used the same set up and clean up technique every time.
Lesson 3: The Art Of Planning
Setting up work stations was the most important element of classroom management during this lesson. The first activity we did in this lesson required students to draw plans for their exhibit from multiple viewing perspectives. As usual, we began class with everyone gathered in the middle of the class to listen and discuss information relevant to todays activity. Once every one was clear on the days objective I explained that students would be divided into three groups and each group would rotate through each station. There was one teacher who stayed at each station while students rotated through all three in 10 minute intervals. This allowed all students to receive guidance from each teacher and allowed for each teacher the opportunity to check in with every student to discuss project direction. I gave each student a number between one and three, then I had all of the ones meet me at the birds eye view station, all of the twos meet Melanie at the creatures eye view station and all of the threes meet Dan at the peoples eye view station. I kept an eye on the time and had each group rotate to the next station every ten minutes. After every one had gone to all three stations I asked them to put away the drawing materials at the station they ended with. When they were finished they brought their sketchbooks with them to the front of the room and prepared to talk about their drawings. After each student shared they put their sketchbook in a pile on the table in the front of the room and left for recess.
The next activity, which required the use of multimedia materials, was structured very similarly. Because we began this portion of the lesson on halloween, we expected students to have a hard time staying focused on the task at hand. To combat this and ensure student success, we incorporated halloween into the class session as much as possible while still staying on task with the project. We began class by having each student share what they were going to be for Halloween. After a student shared their costume, the were given their sketchbook and asked to be respectful of their peers who were still sharing. Next, I had them do multi-media activity structured around the idea of trick or treating. Each teacher was at one of three stations with a box of assorted of mixed media materials. Students rotated through each station to collect mixed media materials for their project. After students had their materials they returned to their desks to experiment with how these could be used to make an element of their creatures environment. As each student finished they had to check in with one of the teachers and discuss the element of their environment they made before being given their box. Clean up was structured the same way as it was in the last activity. Students were divided into groups and assigned a different clean up task that they were responsible for. Once the room was clean, everyone gathered in the front of the class to share the discoveries they made before heading to recess.
-Unit Lesson Plans:
Lesson 1: Breaking Ground
To begin, students get their unique imaginations rolling by sketching ideas for their creature/ mystical animal in their sketchbook. After a bit of brainstorming, Students will look through books that focus on natural biology while sketching down their ideas and building upon previous knowledge. Research done by each student will depend on the creature they choose. The students will be able to use traditional resources for ideation of new art. One visual element we will ask students to focus on is how the texture of their creature is influenced by the environment it lives. We want students to understand how physical features of their creature are related to the environment they live in. This art lesson is focused on developing ideas and showing students the importance of understanding your subject matter when creating a work of art. To assess what the students have learned, the teachers will collect a ticket out the door consisting of a quick write that explains what the creature eats, where it lives, and how big it is.
Reflection:
I was the main teacher for this class session. In class that day we fully introduced the unit activity, and started by showing them pictures of historically famous work that included mythical creatures. Through a series of questions, students were able to begin recognizing how much they could understand about the creature through looking at the visual cues provided by the artist. Then, as a class, we collaboratively created a list of creature features that all students needed to research when we went to the library .Students recorded their findings with notes and drawings in their sketchbooks. To wrap up class we re-grouped in the classroom and discussed what we found out about our animals in the library.
I thought it was very interesting to see how excited the students were to research and draw in their sketchbooks. They were all eager to participate in discussions both before and after we went to the library, and they all worked diligently in the library to find information about their animal. At the end of class when I asked if the students thought they needed another day for sketchbook research they almost unanimously agreed that they wanted one more day in the library. I was surprised to see that they were so interested in the research process. I was worried that they would be uninterested in the fact-finding component of this project but I was pleasantly surprised. In the future I want to work hard to keep their level of enthusiasm high with this project. We are lucky that they are genuinely interested and excited about this project. As teachers we need to keep working hard to make every activity both engaging and fun.
|
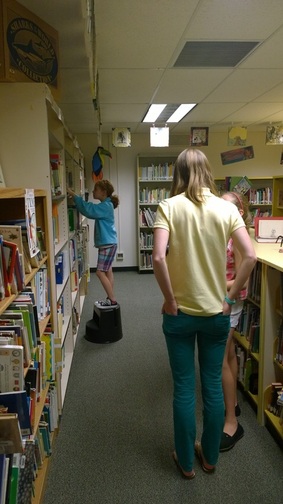
The picture to the right depicts shows Melanie helping a student determine which books will help them find out what kind of vegetation her animal will eat and the climate of her creatures environment. This particular students animal lived in the jungle. Melanie helped get her on the right track by referring her to books about the Amazon Rainforest.
|
|
|
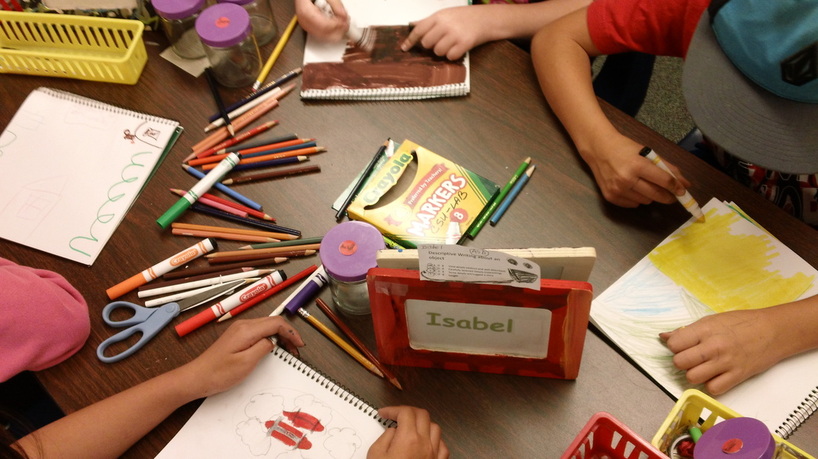
The picture to the left shows students taking notes in they began to take notes in their sketchbook about important elements of their creature and its environment. This was a way for students to begin developing ideas and to help them start considering what they will need during their art making processes. After they had their notes gathered, the teachers had the students do rough sketches of their creature and their environments in their sketchbooks. Many of the students chose to do mystical/imaginary creatures. Some creatures had many different animal parts.
|
Lesson 2: Feeling it out
This lesson focused on visual elements of 2-D texture and how they relate to creating texture in a 3-D form. This lesson is also geared towards getting the students to experiment with and explore the new material of clay. Whether they are building it up, scratching away at it, or imprinting things into it, students will work towards replicating textures they recognize from the world around them with. Also students will be introduced to traditional clay building techniques such as slip and score, coil building, use of armature, and pinch pots. Through this process, students will explore a variety of tools that can be used with clay to actually begin building their creature . This will be one of the guiding steps towards figuring out which direction they want to take their zoo enclosure. In this lesson we will also emphasize how to transfer drawn 2-D plans for the animals into 3-D clay creations. Once students have become more comfortable with the material of clay we will focus on deepening the relationship between the creature and its environment by reiterating the importance of physical features such as texture and animal anatomy.
This lesson focused on visual elements of 2-D texture and how they relate to creating texture in a 3-D form. This lesson is also geared towards getting the students to experiment with and explore the new material of clay. Whether they are building it up, scratching away at it, or imprinting things into it, students will work towards replicating textures they recognize from the world around them with. Also students will be introduced to traditional clay building techniques such as slip and score, coil building, use of armature, and pinch pots. Through this process, students will explore a variety of tools that can be used with clay to actually begin building their creature . This will be one of the guiding steps towards figuring out which direction they want to take their zoo enclosure. In this lesson we will also emphasize how to transfer drawn 2-D plans for the animals into 3-D clay creations. Once students have become more comfortable with the material of clay we will focus on deepening the relationship between the creature and its environment by reiterating the importance of physical features such as texture and animal anatomy.
Reflection:
After students arrived, Melanie had them gather in the front of the class while she gave a short introduction to the concept of texture and discussed with the class what different types of textures they may need to figure out how to make with clay. Next, Melanie let them lose to experiment with what they could do with the clay. In order to give this time to experiment a little more structure, I wrote down different categories of texture on pieces of paper and put them on the front table. Then we asked the students to do their best to contribute as much as they could to our “discovery table” by making texture samples the size of a quarter and placing them in the corresponding category. The level of student motivation increased immediately as there was almost a constant stream of several students who could not wait to contribute to the discovery table and tell how they created it. If I could teach this lesson again I would incorporate more ideation and exploration activities such as the discovery table.
What I learned from this lesson is the value of guidance within free discovery time. While I do think students learn a lot from being given the freedom to explore, without an end goal in mind they did not really know where to begin. The free time we gave them began with us just asking them to experiment with the clay. That kept their attention for a while but, soon after they started it became clear that their engagement in the activity was beginning to fade. However, once we introduced the discovery table their level of engagement increased almost instantly as they began to discover how easy it was to make clay do such a wide variety of things.
|
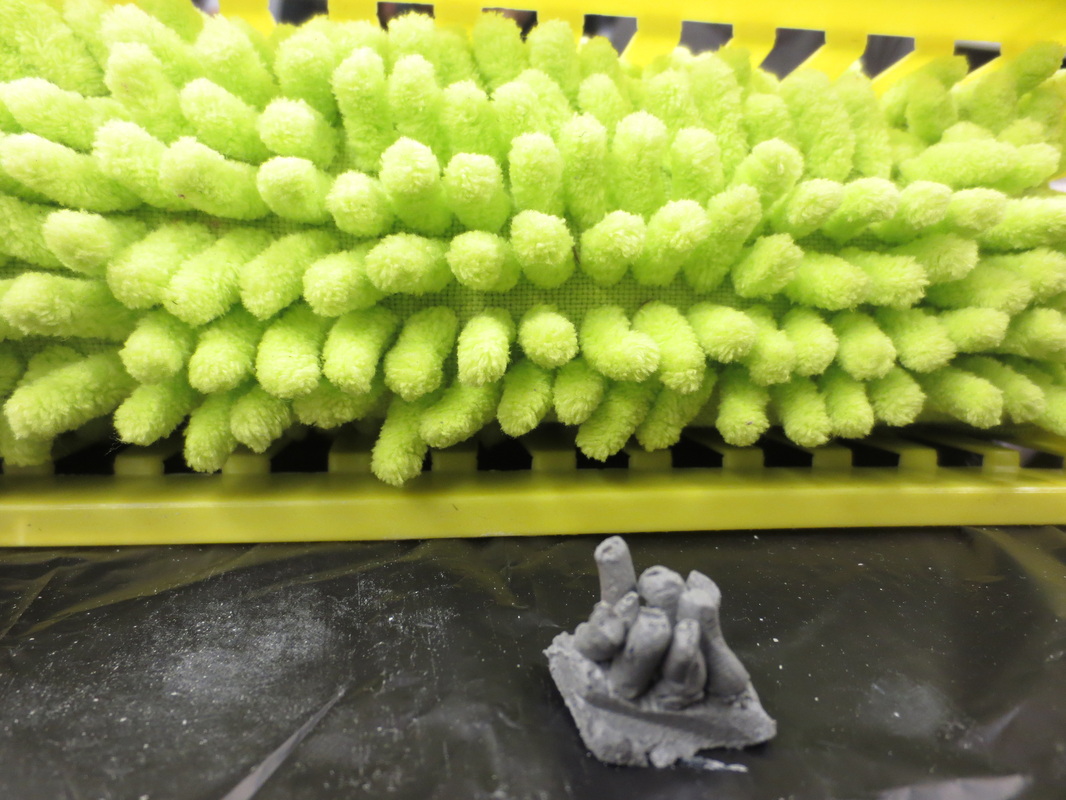
The picture to the right displays a students ability to mimic texture. The green object is a soft surface the students were asked to recreate with clay to get the lesson started. Below the green object is a students replication of texture that they were ready to contribute to the discovery board. You can see how the student was able put individual pieces of clay close together to recreate the same feeling of texture experienced by the viewer when closely observing the example object.
|
|
|
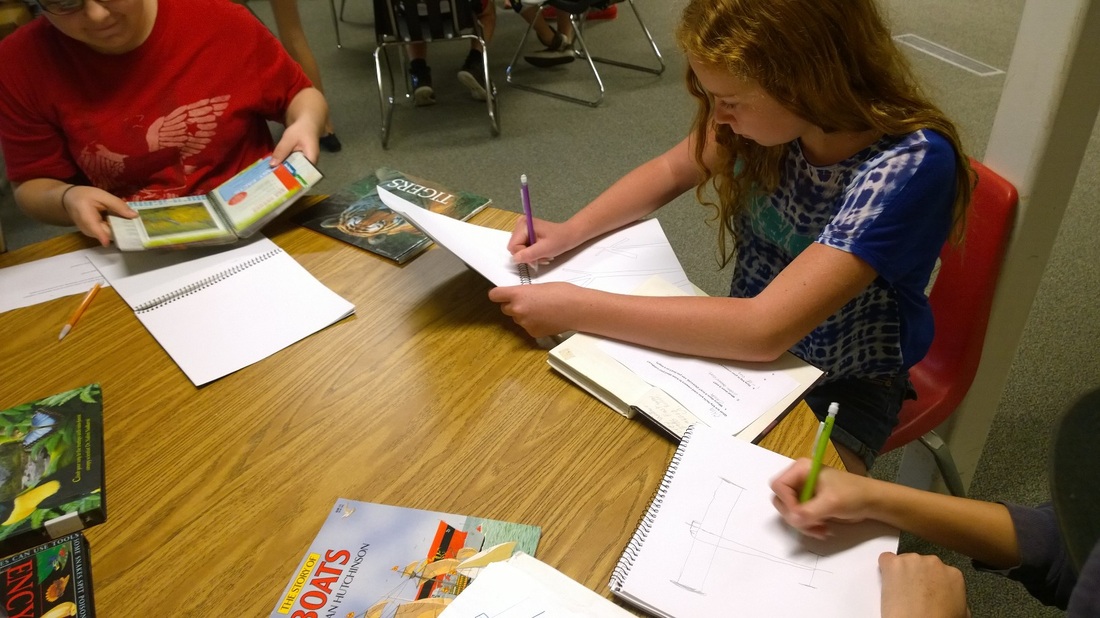
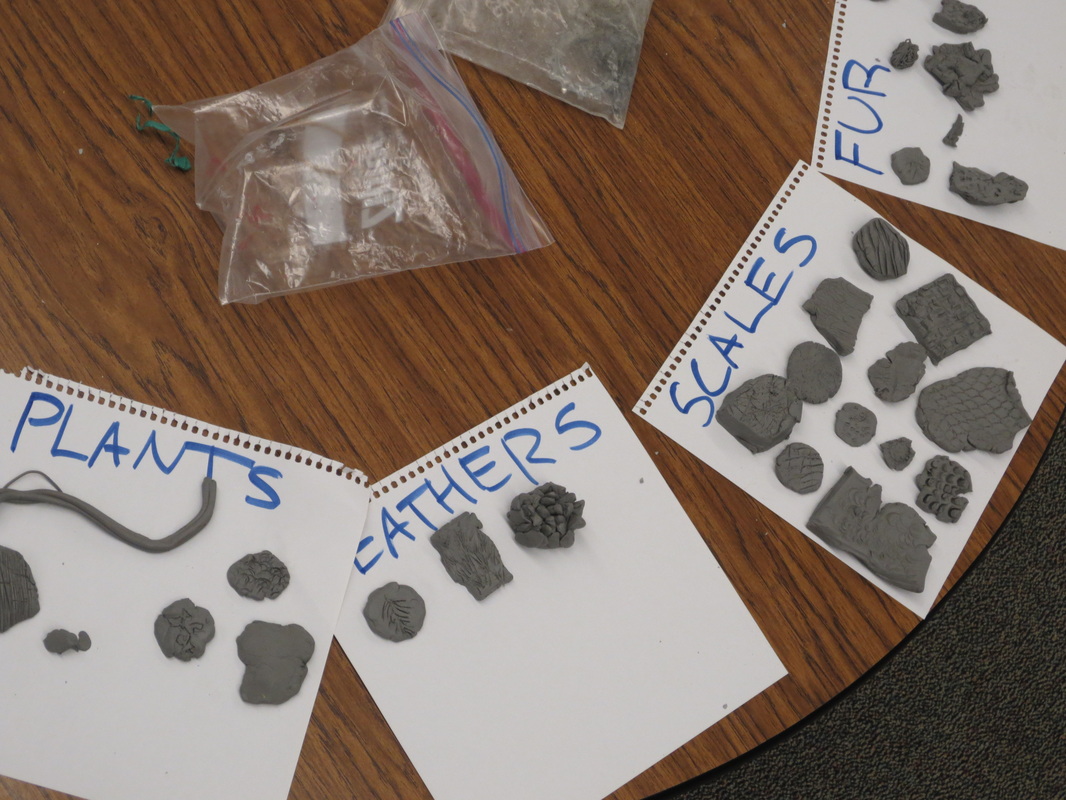
Pictured to the left is the "Discovery Table" made during class to display all the different textures students were able to find while working with their clay. On the table were pieces of paper labeled with different categories of texture. Every time a student discovered how to make a new texture, they were to make a sample of that texture that was roughly the size of a quarter. Next they were to come to the Discovery Table and place that texture in the category they felt best described their texture. By working to discover new ways to create textures students were able to teach themselves about what they clay was capable of and how they could manipulate it to their advantage. By setting all of the examples in one place students were excited and inspired by what they saw their peers discovering.
|
|
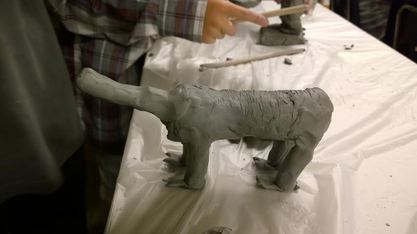
The image to the right shows what will soon be a creature called a Griffin. A Griffin is an animal that is half lion, half eagle. You can see that he has gotten started on the lion component of this creature by looking at the body form. This student used a combination of the slab building and armature techniques to create a hollow body form. He demonstrated the scratch and slip techniques in his decision to attach the legs to the body form. Also, this student is demonstrating his intention behind this creature with his inclusion of a fur like texture on the creatures back.
|
|
Lesson 3: Art of planning
The overarching theme of this lesson is how to take an idea in your head and bring it to life by creating an art object. In this lesson we will look deeper into the planning process by focusing on how artists use 2-D mediums to create 3-D works of art. Students will look at how several artists plan for 3-D production by drawing from several perspectives. Students will then plan for their own 3-D production by drawing their enclosure from 3 different perspectives: that of a zoo visitor, of the creature they created, and of a bird flying overhead. After creating 2-D plans for their creatures environment students will bring their ideas to life using a wide variety of mixed media materials. Once they have finished their individual enclosures we will talk about the importance of presentation by putting the enclosures together to prepare for the “big opening” of their zoo. Students will reflect on their design decisions by putting together informational brochures that are intended to let visitors know more about their animal.
The overarching theme of this lesson is how to take an idea in your head and bring it to life by creating an art object. In this lesson we will look deeper into the planning process by focusing on how artists use 2-D mediums to create 3-D works of art. Students will look at how several artists plan for 3-D production by drawing from several perspectives. Students will then plan for their own 3-D production by drawing their enclosure from 3 different perspectives: that of a zoo visitor, of the creature they created, and of a bird flying overhead. After creating 2-D plans for their creatures environment students will bring their ideas to life using a wide variety of mixed media materials. Once they have finished their individual enclosures we will talk about the importance of presentation by putting the enclosures together to prepare for the “big opening” of their zoo. Students will reflect on their design decisions by putting together informational brochures that are intended to let visitors know more about their animal.
Reflection:
The lesson was meant to teach students about perspective while they planned how they wanted their exhibit to look. We started class by looking at construction plans for the CSU art building. While looking at the different perspectives included in these plans, we discussed where the students thought the viewer was standing in relation to the image on the paper as well as what the students were able to identify from looking at the plans. After that we talked a little bit about three different perspectives we called; birds eye view, creatures eye view, and visitors eye view. I showed them an example of how different an artists plans look compared to their final product then split them into three groups. Each group was to go to either the birds eye, peoples eye, or creatures eye view station and draw what they want their exhibit to look like from each perspective. With the help of either Dan, Melanie, or myself, each student drew their exhibit from each perspective.
I heard a few students complain that they did not know how to draw well enough to depict the different perspectives but these issues were quickly resolved with a little discussion of the perspective itself. Most of the students actually ended up going much farther in depth with their exhibit than I expected. This is a great example of how important the presentation of an activity is. With out an interesting example images and an engaging introduction I do not think students would have been as interested in the planning component of this lesson as they were.
The creativity with this activity started out pretty slow then quickly gained speed as the students continued to draw. This showed me that using a whole day for planning was necessary for them to clarify their own ideas. The one thing I would do differently in this lesson as a whole would be to create an activity to help them transition from this planning activity to the next activity in this lesson, which was mixed media creations. They did so well and learned so much through the 2-D planning activity that I think they may have really benefitted from making a building plan before starting on their actual environment. I think students would have really benefitted from an engaging activity that allowed them to make a plan for how they wanted to actually go about building the physical environment.
|
The picture to the right depicts students working on their creatures-eye view sketch. The students imagined what the environment they wanted to create would look like through the eyes of their creature. The student towards the bottom, emphasized her creature who lived in the clouds by drawing clouds with a pencil then the "bed" in marker. This showed the teacher she had an understanding of color, texture and value and spatial perspective.
|
|
|
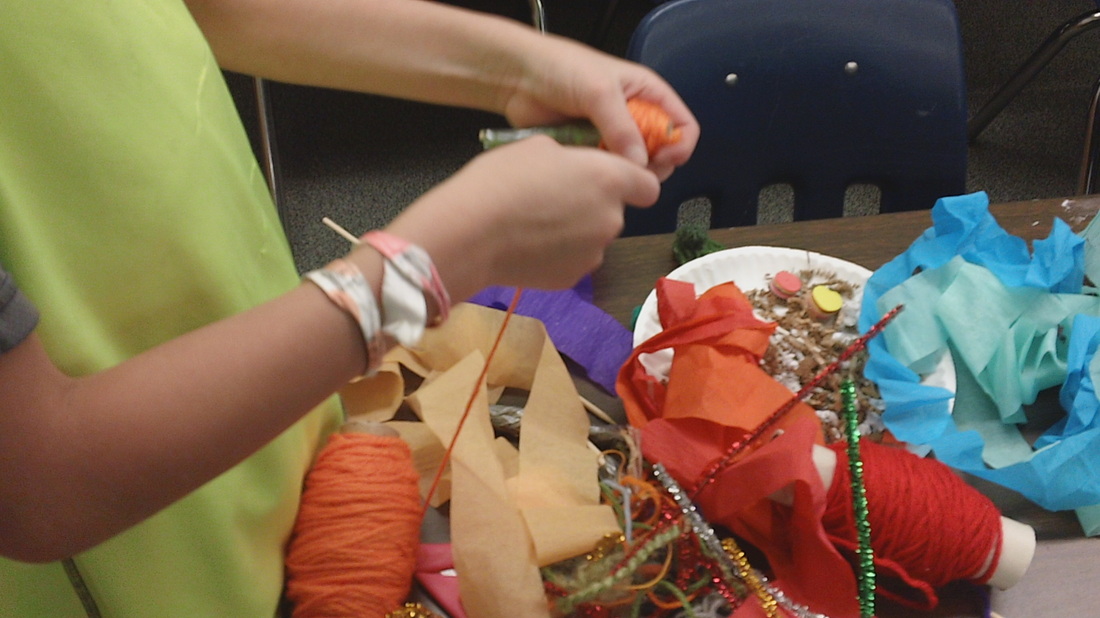
After the students collected their mixed media materials, it was time to start creating. The students objective was to create one structure from their plan with the materials they found to incorporate into their enclosure. The student pictured to the left is experimenting with different things he can do with the mixed media materials.
|
|
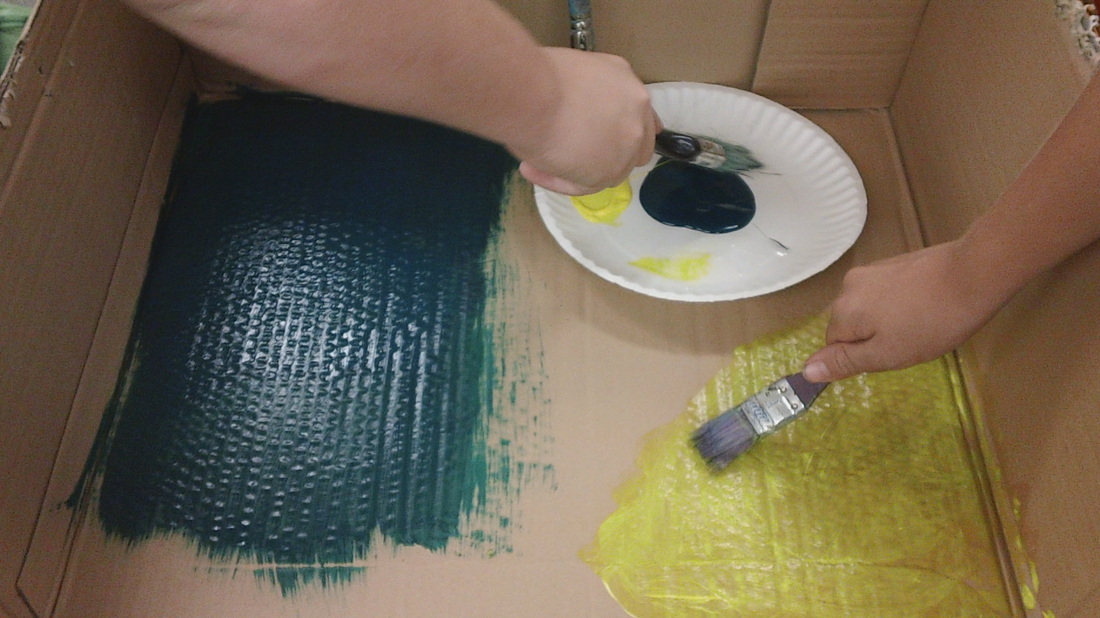
Students had the option to work in pairs on an enclosure as long as their creatures had similar environments and wouldn't endanger each other. The two students pictured to the left made a really interesting discovery when painting the base of their enclosure. The paint was still cold from being left in the car so the pigment and bonding components separated. This was a great way to introduce the properties of paint. The two students noticed that when painting with the clear bonding component on top of another color, the color became super glossy. They continued to ask for the clear acrylic binding because they were painting water.
|
|
|
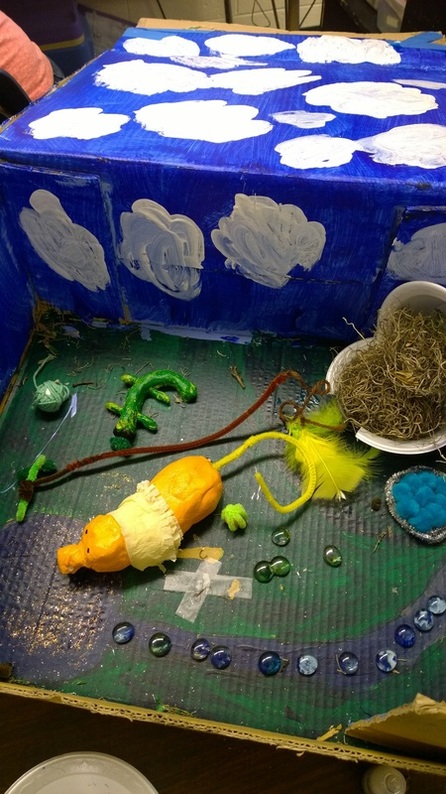
The picture to the left shows one of the completed exhibits that two students worked together on. Both students have worked very hard to meet the needs of both animals in their exhibit. On the last work day, these students added final details like painting clouds in the sky, and attaching the lions tail. You can see by looking at the picture that these students made sure they provided their animals with food, shelter, and drinking water.
|
